Wednesday, August 3, 2011

Pickled Red Cabbage

Pickled Red Cabbage

Years ago we drove to Solvang and
found ourselves, like many do in that touristy haven of Danish delights, in a side cafe eating a simple breakfast. It was the first time I'd had eggs benedict and the first time Holly had tried pickled red cabbage. I can remember the look on her face as she ate it. She was delighted and in flavor heaven. "You have to try this!" I did, and didn't like it much. Knowing that it pleased her, however, I decided that I'd make it for her on occasion. Over time I've grown an affinity for it but I still make it "for Holly". In fact, I made a big batch of it for her graduation party a few years ago and it was a enjoyed by all.

We're having a friend over for dinner tonight so yesterday I whipped up this batch to go with the lamb meatballs we'll be making. Yum!

Ingredients:


1/2 large head of Red Cabbage
2 tbsp Butter
2 tbsp Sugar
1 tbsp Vinegar (I use Red Wine Vinegar)
1/4 cup of water


* I had already chopped up half of it when I took this picture.

Directions:

Thinly shred or neatly chop the cabbage, add sugar, butter, vinegar and approximately 1/4 cup of water. Cover and simmer for about 2.5 hours, stirring occasionally. About 15 minutes from the end, taste and add more vinegar or sugar to your liking.

I speak from experience when I say this dish is decidedly better when reheated. I like to make it a day in advance. Let it steep in it's own flavorific existence, you know?

Calories: About 225 in 1 cup... but 1 cup is a lot if this is a side dish.

Tuesday, August 2, 2011

Pad Thai with Chicken and Red Bell Pepper

Pad Thai with Chicken and Red Bell Pepper

Those of you close to me know that I've never minded cooking but it wasn't until Holly came home from Thailand that my cooking bug took over. She'd been in an environment where almost every food she ate was new to her and when she came home her desire to try new foods, any kind, was peaked. I have taken advantage of this reality without reservation. Of everything I make around here, stir-fry is probably the most common thing and the easiest.

It's Tuesday and I'm not really into making anything complicated, so out comes the wok and in goes the tasty. Speaking of the wok, check out that beautifully seasoned one down below.

The format of this one looks odd because I copied my own recipe from another site I use.

Ingredients:

4 4oz Chicken Tenderloins, cubed
3 small shallots, sliced
.25 cup raw scallions cut into 1" strips
2 cloves garlic, minced
1 tsp crushed red pepper
2 tbsp cooking oil
2 tbsp chicken broth or water
1 tbsp fish sauce
2 tbsp oyster sauce
1/2 large red bell pepper, sliced
1 tsp palm sugar (or regular sugar)
200g Rice Noodles
2 tbsp chopped coriander (cilantro)
2 tbsp crushed peanuts

Cooking Instructions:

Heat oil in wok on medium heat. Add garlic and shallots and stir for 30 seconds.

Add chicken and crushed red pepper. Stir until chicken is cooked about 4 minutes.

Add water/broth and red bell pepper slices. Cook for about 3 minutes. You want the bell pepper to be nice and hot but still crunchy.

Include the oyster sauce, fish sauce and sugar. Immediately add the cooked rice noodles (I suggest boiling them for 2 mins prior to use) and stir vigorously. 2 mins.

Add scallions and stir for 30 seconds more.

Serve. Once plated top with coriander and crushed peanuts.

Serving Size: Makes 3 servings (the way I eat)

Nutritional Info
Fat: 18.4g
Carbohydrates: 58.9g
Calories:538.1
Protein: 39.2g


Monday, August 1, 2011

Baked Salmon with Breaded Topping and Falafel

Baked Salmon with Breaded Topping, Falafel and Steamed Veggies

Holly and I were down at our local Greek market and as she was picking up her beloved apricot
jam when I saw this box of falafel mix and thought "This will go great with that salmon in the freezer".

"Have you ever had Falafel?," I asked.

"I don't think so."

"Well you're about to have it for dinner."

The Falafel was incredibly easy to make. I bought the Casbah brand and all you do is add water and fry them. So simple and tasty. I'm not going to detail the prep for it here other than to indicate that you should heat your oil and your oven at the same time. It paired very well with a baked salmon recipe I obtained and slightly modified from www.cooks.com and I think you'll like it.

Step One:

a) For Salmon: Pre-heat oven to 450F


b) For Falafel: In a sturdy frying pan, heat about 1" of oil vegetable oil at medium heat. Don't get fancy and try and use Olive Oil. It's more acidic than vegetable oil and will likely strip any coating off your pan. These only take about 2 mins to cook so fry them up about halfway through the
salmon bake time.


Step Two:

A) Spray a coat on non-stick onto shallow baking dish and lay your salmon fillet down on it.

B) Sprinkle the following ingredients onto the salmon and then rub them in for good measure:

1 tsp. dried oregano
2 cloves garlic, minced
1 large onion, chopped
Pepper to taste
2 tbsp. herbs de Provence

Step Three:

Now in a separate bowl mix together:

1/4 c. dry bread crumbs
1 tbsp. vegetable oil

Top the fillet generously with the breading.


Step Four:

Place in the pre-heated oven and bake for 8 - 10 minutes or until the fish is nice and flaky. The topping should also turn a beautiful tanned color and get a little crunchy.

Step Five:

Serve with the falafel and steamed veggies. You win.


Paired up with my Belgian Ale (Straffe Hendrik) very well. Definitely had leftovers that reheated nicely for lunch the next day.

Calories: Only about 550 calories (if you don't include the beer).

Saturday, July 30, 2011

Chili Dry Rub Salmon with Saffron Rice and Steamed Veg

Chili Dry Rub Salmon with Saffron Rice and Steamed Veg

Most people who've been to Costco and look in the fish case have probably thought the same thing I always do, namely "What in the heck am I gonna do with that much salmon?" Well I was craving salmon so after I decided to freeze most of it, I started thinking that a dry rub something or other would probably make a darned good dinner. I was right.


Pre-heat your oven to 400F.

Step One:

I found this recipe online at www.food.com. While I can't take credit for it, I can attest to it's tastiness. Can I just take a moment and say I love knowing that I had all of these ingredients in the cupboard and none of them were old or stale? Take all of the following:

  • 1 tablespoons sugar
  • 1/2 tablespoon chili powder
  • 1/2 teaspoon pepper
  • 1/4 tablespoon cumin
  • 1/4 teaspoon salt
  • 1/8 teaspoon dry mustard
  • 1/8 teaspoon cinnamon

  • ...and mix them together well. Taste it before we do step two and just imagine how it's going to taste on that naughty piece of salmon.

    Step Two:

    Spray a non-stick in a glass casserole dish. Lay your salmon fillets down and rub the rub all over those bad boys. Be generous.

    Step Three:

    Place in oven for about 20 mins. Recommended time is about 10 mins per inch but the oven I cook with was installed in the 70s and is awful. Everything I cook in there takes longer that it's supposed to. Remove from heat when flakey. Once thing I've learned about salmon is that it continues to cook for a couple of minutes once you remove it from the heat so it can overcook itself pretty quickly if you aren't careful.

    Look at that picture... that's one sexy piece of salmon.

    Saffron Rice:

    I cheat and use Mahatma brand Saffron Rice. We love that stuff. Takes 20 mins to cook.

    Steamed Veggies:

    Take one head of broccoli and cut into spears. Slice up the squash of your choice (mine is yellow), sprinkle with salt and steam to desired softness. I use my rice cooker to steam most things as it came with a steaming tray.

    Wednesday, July 27, 2011

    Leftover garlic bread sammich with onion and garlic mayo

    Leftover Garlic Bread Sammich with Onion and Garlic Mayo

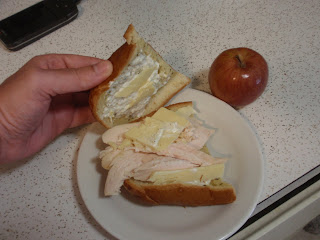
    I was sitting on the couch wonderin' how I was going to prepare my lunch. I'd already decided that last night's garlic bread from our local market was going to be the base and the chicken breast I saved from the roaster I made up would make the meat. Just plain ole' chicken on garlic bread wasn't going to be enough. I looked up at the mortar and pestle atop the fridge and found inspiration... make some garlic and onion mayo to go with it. I won the sandwich war today!

    Step One:

    Slice an onion thinly, just one slice. Add the onion and 1 clove of garlic to your m&p and mash to a pulp. Once mashed up nicely add some salt and pepper to taste. The addition of the salt helped to cut the strong garlic taste. I started with a pinch of each.


    Step Two:

    Put that beautiful paste into another bowl/container with
    1 tbsp of mayo. Mix together well. Add more seasoning as needed.


    Step Three:

    Smear a coating of your new mayo blend on both sides of the garlic bread. Add the thinly sliced chicken breast and cheese (I've been using the block "Coastal" rough cheddar from Costco... so yummy). Close it up and there ya go.


    It was soooo good. A bit high on the calories because of the garlic bread but not a diet killer. About 534 calories but I'm pretty full now.

    Tuesday, July 26, 2011

    Gone but not forgotten...

    A few of you have told me to get back to work on this blog and that's just what I'll do. While I'm not a candidate for any game shows I do keep trying new things and my knowledge base has grown with practice. I'm surprised at how I pick up on the differences in the many white rices out there... I never thought that'd happen. Anyway, stay tuned for more recipes and thanks for the encouragement.

    If you have friends who like to cook tell them to follow me. It's a confidence booster.